For additional guidance, check out our community articles detailing the process of migrating from your current platform to Carbonio CE.
For enterprise-level requirements and advanced features, consider checking out Zextras Carbonio – the all-in-one private digital workplace designed for digital sovereignty trusted by the public sector, telcos, and regulated industries.
The pre-Zimbra installation phase is no fun. That’s why everyone wants to wrap up this phase in no time. But a little planning in this phase can make our server secure, scalable, and futuristic. In this article, we will discuss some aspects of the pre-Zimbra installation phase.
System admins focus on Zimbra installation so much that they forget some basic modifications and tuning in the operating system. These modifications can help our server to be secure and scalable. In this article, you will get some ideas to make these changes.
Keep Zimbra Separate From The System Drive
Let’s assume, you have installed a Zimbra server in a traditional way, without customizing anything. After a few months, you got your server storage full like it is shown in the image:

We can see that you have installed the Zimbra in a traditional way and without any customization. The system directory of Zimbra (/opt/zimbra) is under root (/) directory. Therefore when the /opt/zimbra directory gets full that means the root (/) directory also gets full.
Now in most cases /opt/zimbra gets full due to the below-mentioned reasons:
- Large mailbox size
- Huge log files
So clearing some log files or mailboxes can free up some space for you.
But there is a possibility that due to full storage utilization of your root (/) directory, you will not be able to operate properly to rectify this situation.
Therefore, it is recommended to have a separate /opt partition. So that when your /opt gets full you can still access your server and make necessary rectifications.
For your better understanding, I am giving you another image to compare with the first one:

Now it’s your decision, which side of the coin you want to choose.
Do You Have A Scalable Partition?
Though the LVM feature is known to us for quite some time but still system admins prefer to manage the partition in a standard way.
Now, the standard partitioning is good and less complex but it has nothing to offer extraordinary.
Let’s consider the below-mentioned scenario:

You have managed your server partition in a standard way. If your sever storage gets full, what would you do?
You could free up your storage by removing/downloading emails. But most often system admins need to keep all of their email data.
Hence, they could opt for two possible ways:
- Migrate the service and data to a higher storage server.
- Upgrade storage of existing server.
LVM comes in handy here. It can provide us the flexibility to increase the storage size.
Therefore, your approach during the installation of the operating system should be using LVM-based partitioning.
You can find the LVM details at Logical_Volume_Manager in Linux.
Customize Your Server Login
Whenever a server goes online, it receives continuous unwanted login access requests from different sources around the world. This is the first exposure that an attacker gets to your server.
If you could reduce this attack surface, you could secure your server from lots of vulnerabilities and threats.
So what you could do here:
- Change the default SSH port from 22 to any other random port.
- Disable SSH root login
- Configure the server’s firewall so that only allowed sources are able to connect to the server’s SSH port.

Please keep this in mind, if you change the default SSH port from 22 to any other port you have modified the Zimbra server accordingly. As Zimbra server uses 22 port as it’s zimbraRemoteManagementPort.
Protect Your Server From Memcached
On 2018, Akamai observed a huge memcached reflection attack. It was the largest (almost 1.3Tbps) by the date. Till then it has become all system administrators’ concern to protect it from any vulnerability threat.
If you are a system admin, no matter what services are you running, if you have an active memcached server in your solution, please follow the instructions mentioned in this section.
By default, zimbra memcached runs on port 11211 and listens on the zimbra server’s IP address. The ip can also be reachable from both inside or outside of the local network.

So what do you do to protect your server from any possible memcached exploitation:
- If your zimbra server is behind a firewall, you should block all incoming & outgoing traffics on port 11211 from the internet to your zimbra server.
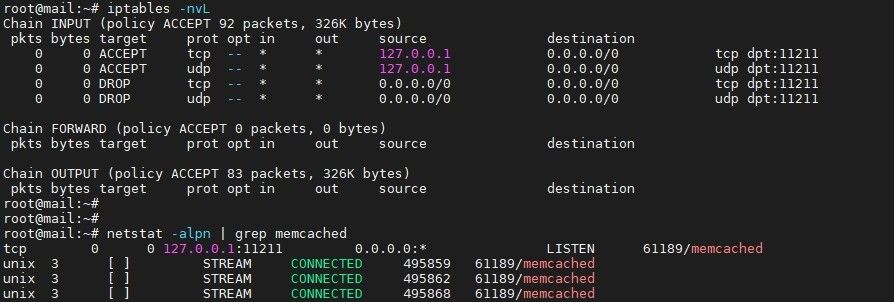
- Furthermore, you should add IP TABLES rules in your zimbra server for this memcached service. Rules will be as follows:
Drop all connections to port 11211;
iptables -I INPUT -p udp --dport 11211 -j DROP
iptables -I INPUT -p tcp --dport 11211 -j DROP

Accept only connections from localhost to this port
iptables -I INPUT -p udp -s 127.0.0.1 --dport 11211 -j ACCEPT
iptables -I INPUT -p tcp -s 127.0.0.1 --dport 11211 -j ACCEPT
Also, modify Zimbra Memcached so that it listens to the local host only
su - zimbra
/opt/zimbra/bin/zmprov ms `zmhostname` zimbraMemcachedBindAddress 127.0.0.1
/opt/zimbra/bin/zmprov ms `zmhostname` zimbraMemcachedClientServerList 127.0.0.1

zmmemcachedctl restart
It will look like the sample image shown below:

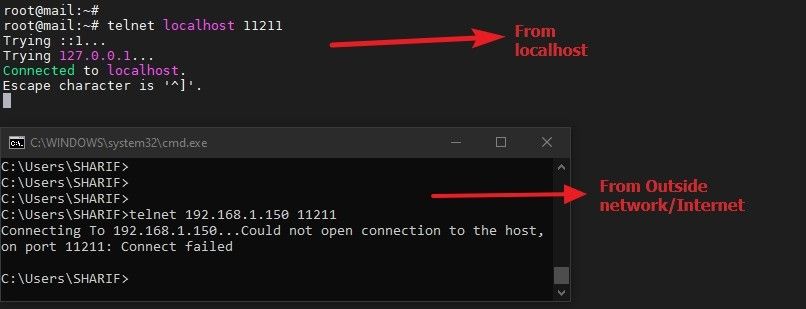
Finally, be sure to check whether the rules are working or not:

Protect Your Server With A Firewall
If your Zimbra server is behind a firewall, you should only allow necessary ports for the Zimbra server in your firewall and all other ports should be blocked.
Now for your convenience, we have another article in our community that explains the used and unused ports of the Zimbra servers in a useful manner. Check out the article about firewall-ports-in-zimbra.
So, these are some basic facts that you should consider during the pre-zimbra installation phase.
That’s all for today.![]()


Comments
[…] process. These preparations are not mandatory but highly recommended. I think you will find How To Prepare An OS For Zimbra Installation very […]