When installing and using Carbonio CE, administrators may encounter unexpected problems that may affect the correct operation and usability of the mail server, but at the same time, they practically do not depend on Carbonio developers in any way. In this article, we have collected some tips on how to solve most of these problems.
Invalid Certificate
When installing Carbonio CE, a self-signed SSL certificate is automatically generated, which is required to establish an encrypted HTTPS connection with the server and ensure confidential work with calendars and e-mail. As a result, when trying to log in to the Carbonio CE web client in all modern browsers, a warning appears about the unreliability of the SSL certificate used. And although this warning can be bypassed, it will still appear once a day and annoy users.
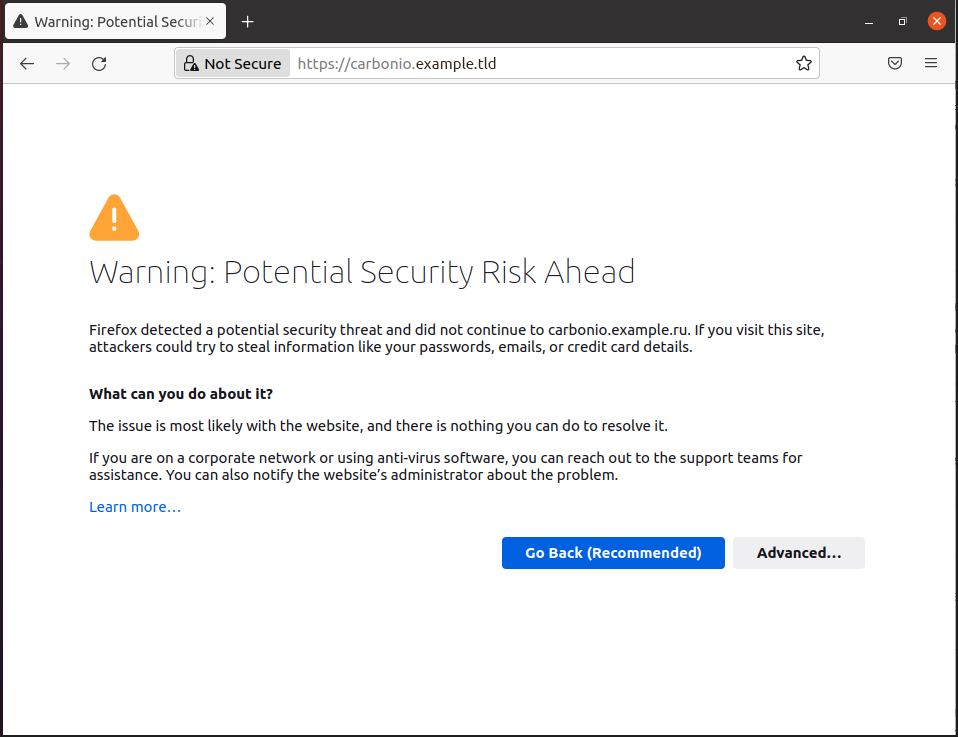
There are two ways to get rid of this warning – by installing a commercial trusted certificate, or by adding an already issued self-signed certificate to the trusted store.
A. To issue a commercial certificate, you will need to generate a CSR with your company and server information using a command like the below and substituting parameters like country, state, etc. with your information:
/opt/zextras/bin/zmcertmgr createcsr comm -new -subject "/C=US/ST=CA/L=Sunnyvale/O='My Company Inc'/CN=mail.example.tld"and use it to issue a commercial certificate.
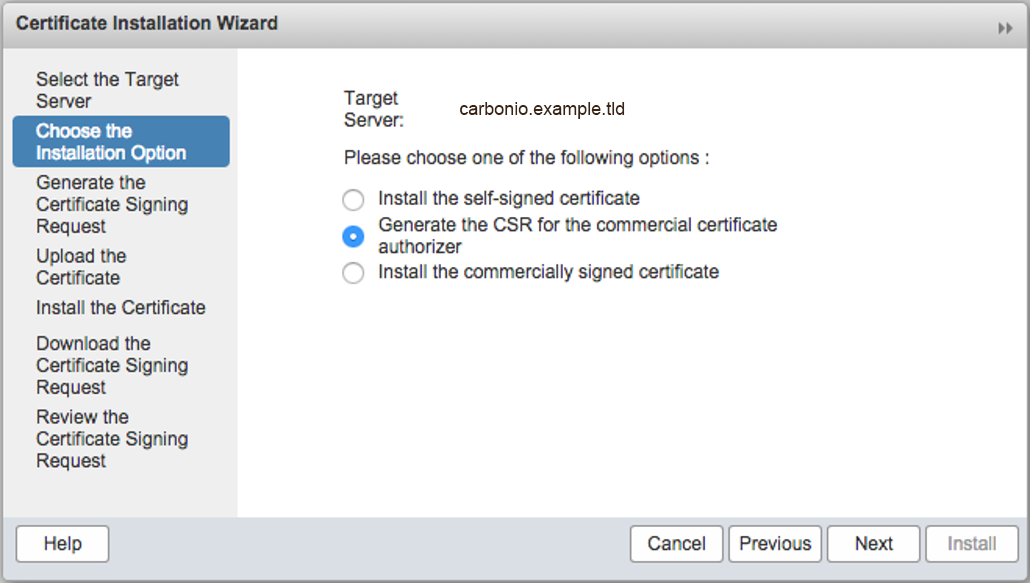
You can also create a CSR in the Carbonio CE administration console.
- In the main menu, click Configure
- Select Certificates
- Click the gear icon on the top right (next to Help) and select Install Certificate
- Select Choose the Installation Option from the left pane
- Select Generate the CSR for the commercial certificate authorizer on the right
After obtaining the certificate files, run the following commands:
cat TrustedRoot.crt DigiCertCA.crt > /tmp/commercial_ca.crt
cp mail.example.tld.crt /tmp/commercial.crt
/opt/zextras/bin/zmcertmgr verifycrt comm opt/zextras/ssl/carbonio/commercial/commercial.key /tmp/commercial.crt /tmp/commercial_ca.crt
/opt/zextras/bin/zmcertmgr deploycrt comm /tmp/commercial.crt /tmp/commercial_ca.crt
With these commands, we combine information about certificate authorities into a single file; add a domain certificate to them; verify the certificate files that we are going to install and after successful verification, we install them.
B. In order to add a self-signed certificate to the trust store, run the following commands on the Carbonio CE server:
sudo su
cd /opt/zimbra/ssl/zimbra/ca
openssl x509 -in ca.pem -outform DER -out /tmp/carbonio.cer
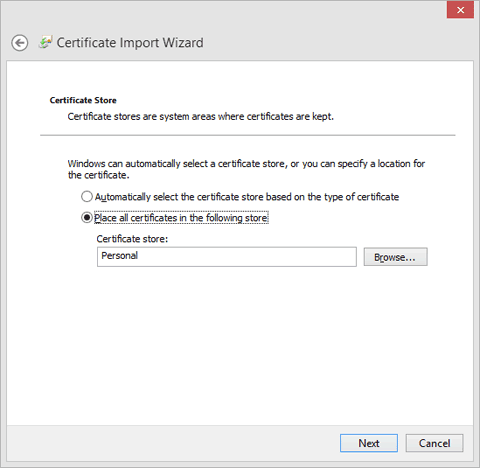
After executing these commands, the carbonio.cer SSL certificate file will appear in the /tmp/ folder, which can be installed with administrator rights in the Windows Trusted Root Certification Authorities either manually or through group policies.
After either of these methods, the warning about a potential threat will disappear on computers where a self-signed Carbonio CE certificate has been added.
Mobile Applications Connection Problem
Carbonio CE has a Carbonio Mail mobile application that allows you to work with mail and calendars on your mobile device. However, when trying to sign in to an Android account, it may display the following error:
java.security.cert.CertPathValidatorExecption: Trust anchor for certification path not found.
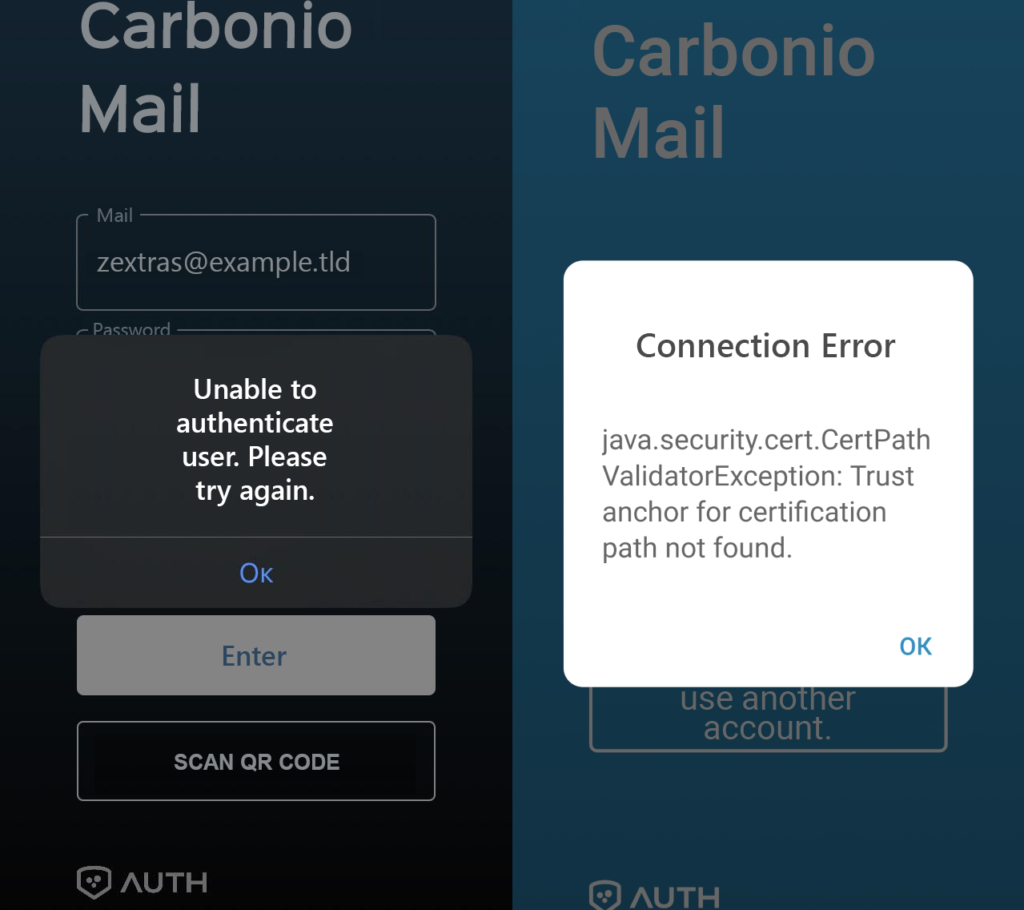
The reason for such errors is also the use of a self-signed SSL certificate. Unlike Windows, mobile devices generally do not support adding self-signed certificates to trust stores, so this problem can only be solved by installing a valid commercial certificate.
Carbonio CE Doesn’t Start And There Is No Way To Change Password
When you install Carbonio CE on a server with the domain name mail.example.tld, the mail domain example.tld, and the user zextras@example.tld with global administrator rights are automatically created. The password for the account zextras@example.tld is automatically generated and cannot be found. In order to log on using that account, you need to change the password. To do this, use the commands
sudo su - zextras
zmprov setPassword zextras@example.tld P@$$w0rD
When you enter the first command, you log in as the system user zextras, which is created during the installation of Carbonio CE, and when you enter the second command, the password P@$$w0rD is set for the user zextras@example.tld.
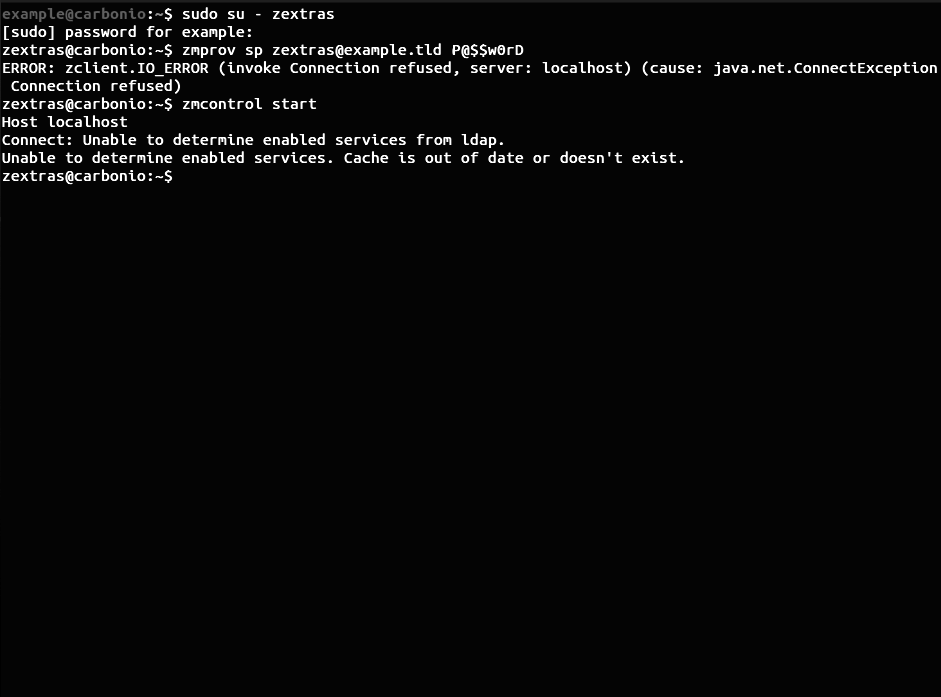
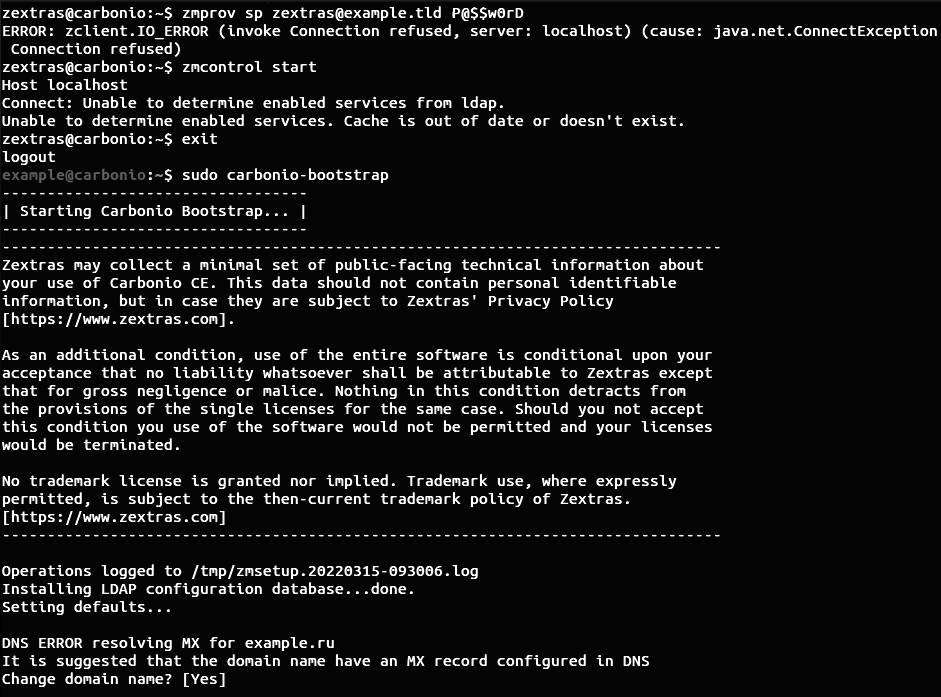
However, a number of users have a problem where they receive an error message in response to a password change command: ERROR: zclient.IO_ERROR (invoke Connection refused, server: localhost) (cause: java.net.ConnectException Connection refused) . Moreover, when trying to restart Carbonio CE, the following error message occurs:
$ zmcontrol startHost localhostConnect: Unable to determine enabled services from ldap.Unable to determine enabled services. Cache is out of date or doesn't exist.This behavior occurs in cases where the user tries to start using Carbonio CE immediately after installation without running the sudo carbonio-bootstrap command necessary for initial setup. After its execution, the server starts working normally.
Error During Carbonio Files Installation
Carbonio Files is a personal file storage manager tightly integrated into the Carbonio CE. It allows users to store the necessary files on the Carbonio CE server, and access them through the Carbonio CE web client and a mobile application. Carbonio Files also allows you to securely share files with your colleagues and even external users.
The process of installing the Carbonio Files module is divided into three steps:
- Installing and configuring Carbonio Mesh
- Installing and configuring PostgreSQL
- Installing Files on Carbonio CE
You can read THIS ARTICLE to learn more about the details of installing Carbonio Files.
In the first step, when configuring Carbonio Mesh, you may encounter an error stating:
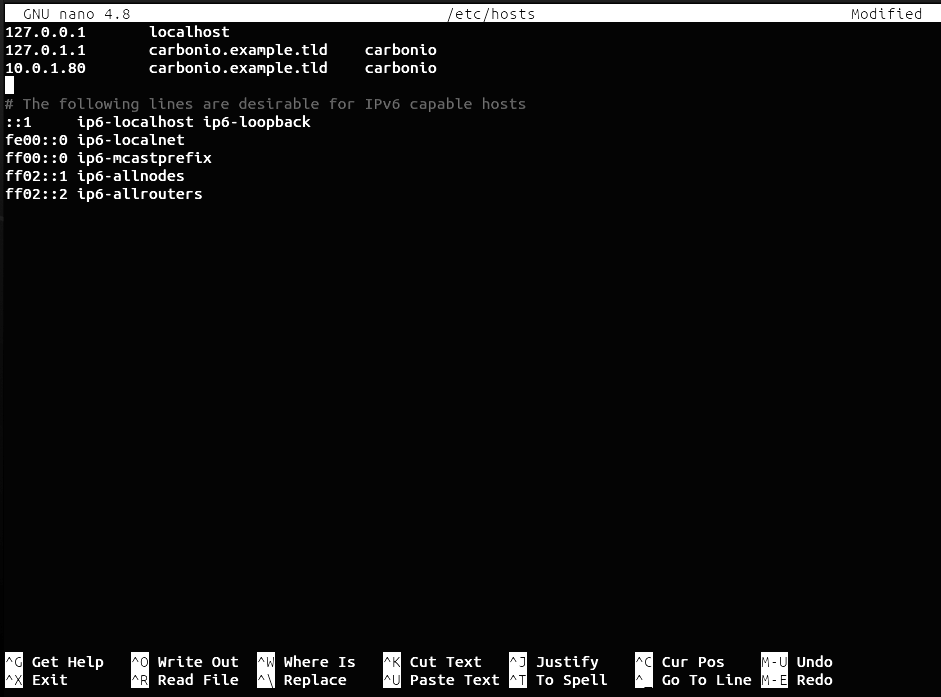
service-discover: error: hostname 'carbonio.example.tld' is resolving with loopback address, should resolve with LAN addressThis error indicates that in your /etc/hosts file, in addition to the added entry for the domain name like 10.0.1.80 mail.example.tld , there is also an entry 127.0.1.1 mail.example.tld.
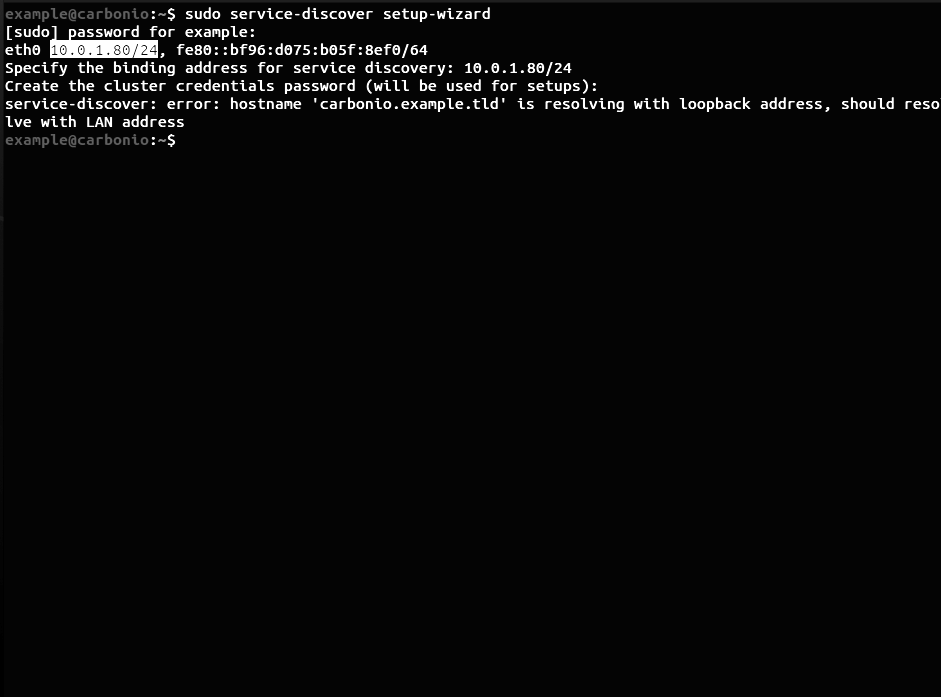
This happens when you set the server’s domain name directly during the installation of Ubuntu 20.04. To fix this, first back up the hosts file by
cp /etc/hosts /etc/hosts.backupThen remove the line 127.0.1.1 mail.example.tld and save the file.