In this article, we will discuss one of the main e-mail protection strategies: DKIM, and show you how to implement it on your Carbonio CE servers properly. We will be following this with more articles talking about other common e-mail protection strategies.
What Is DKIM?
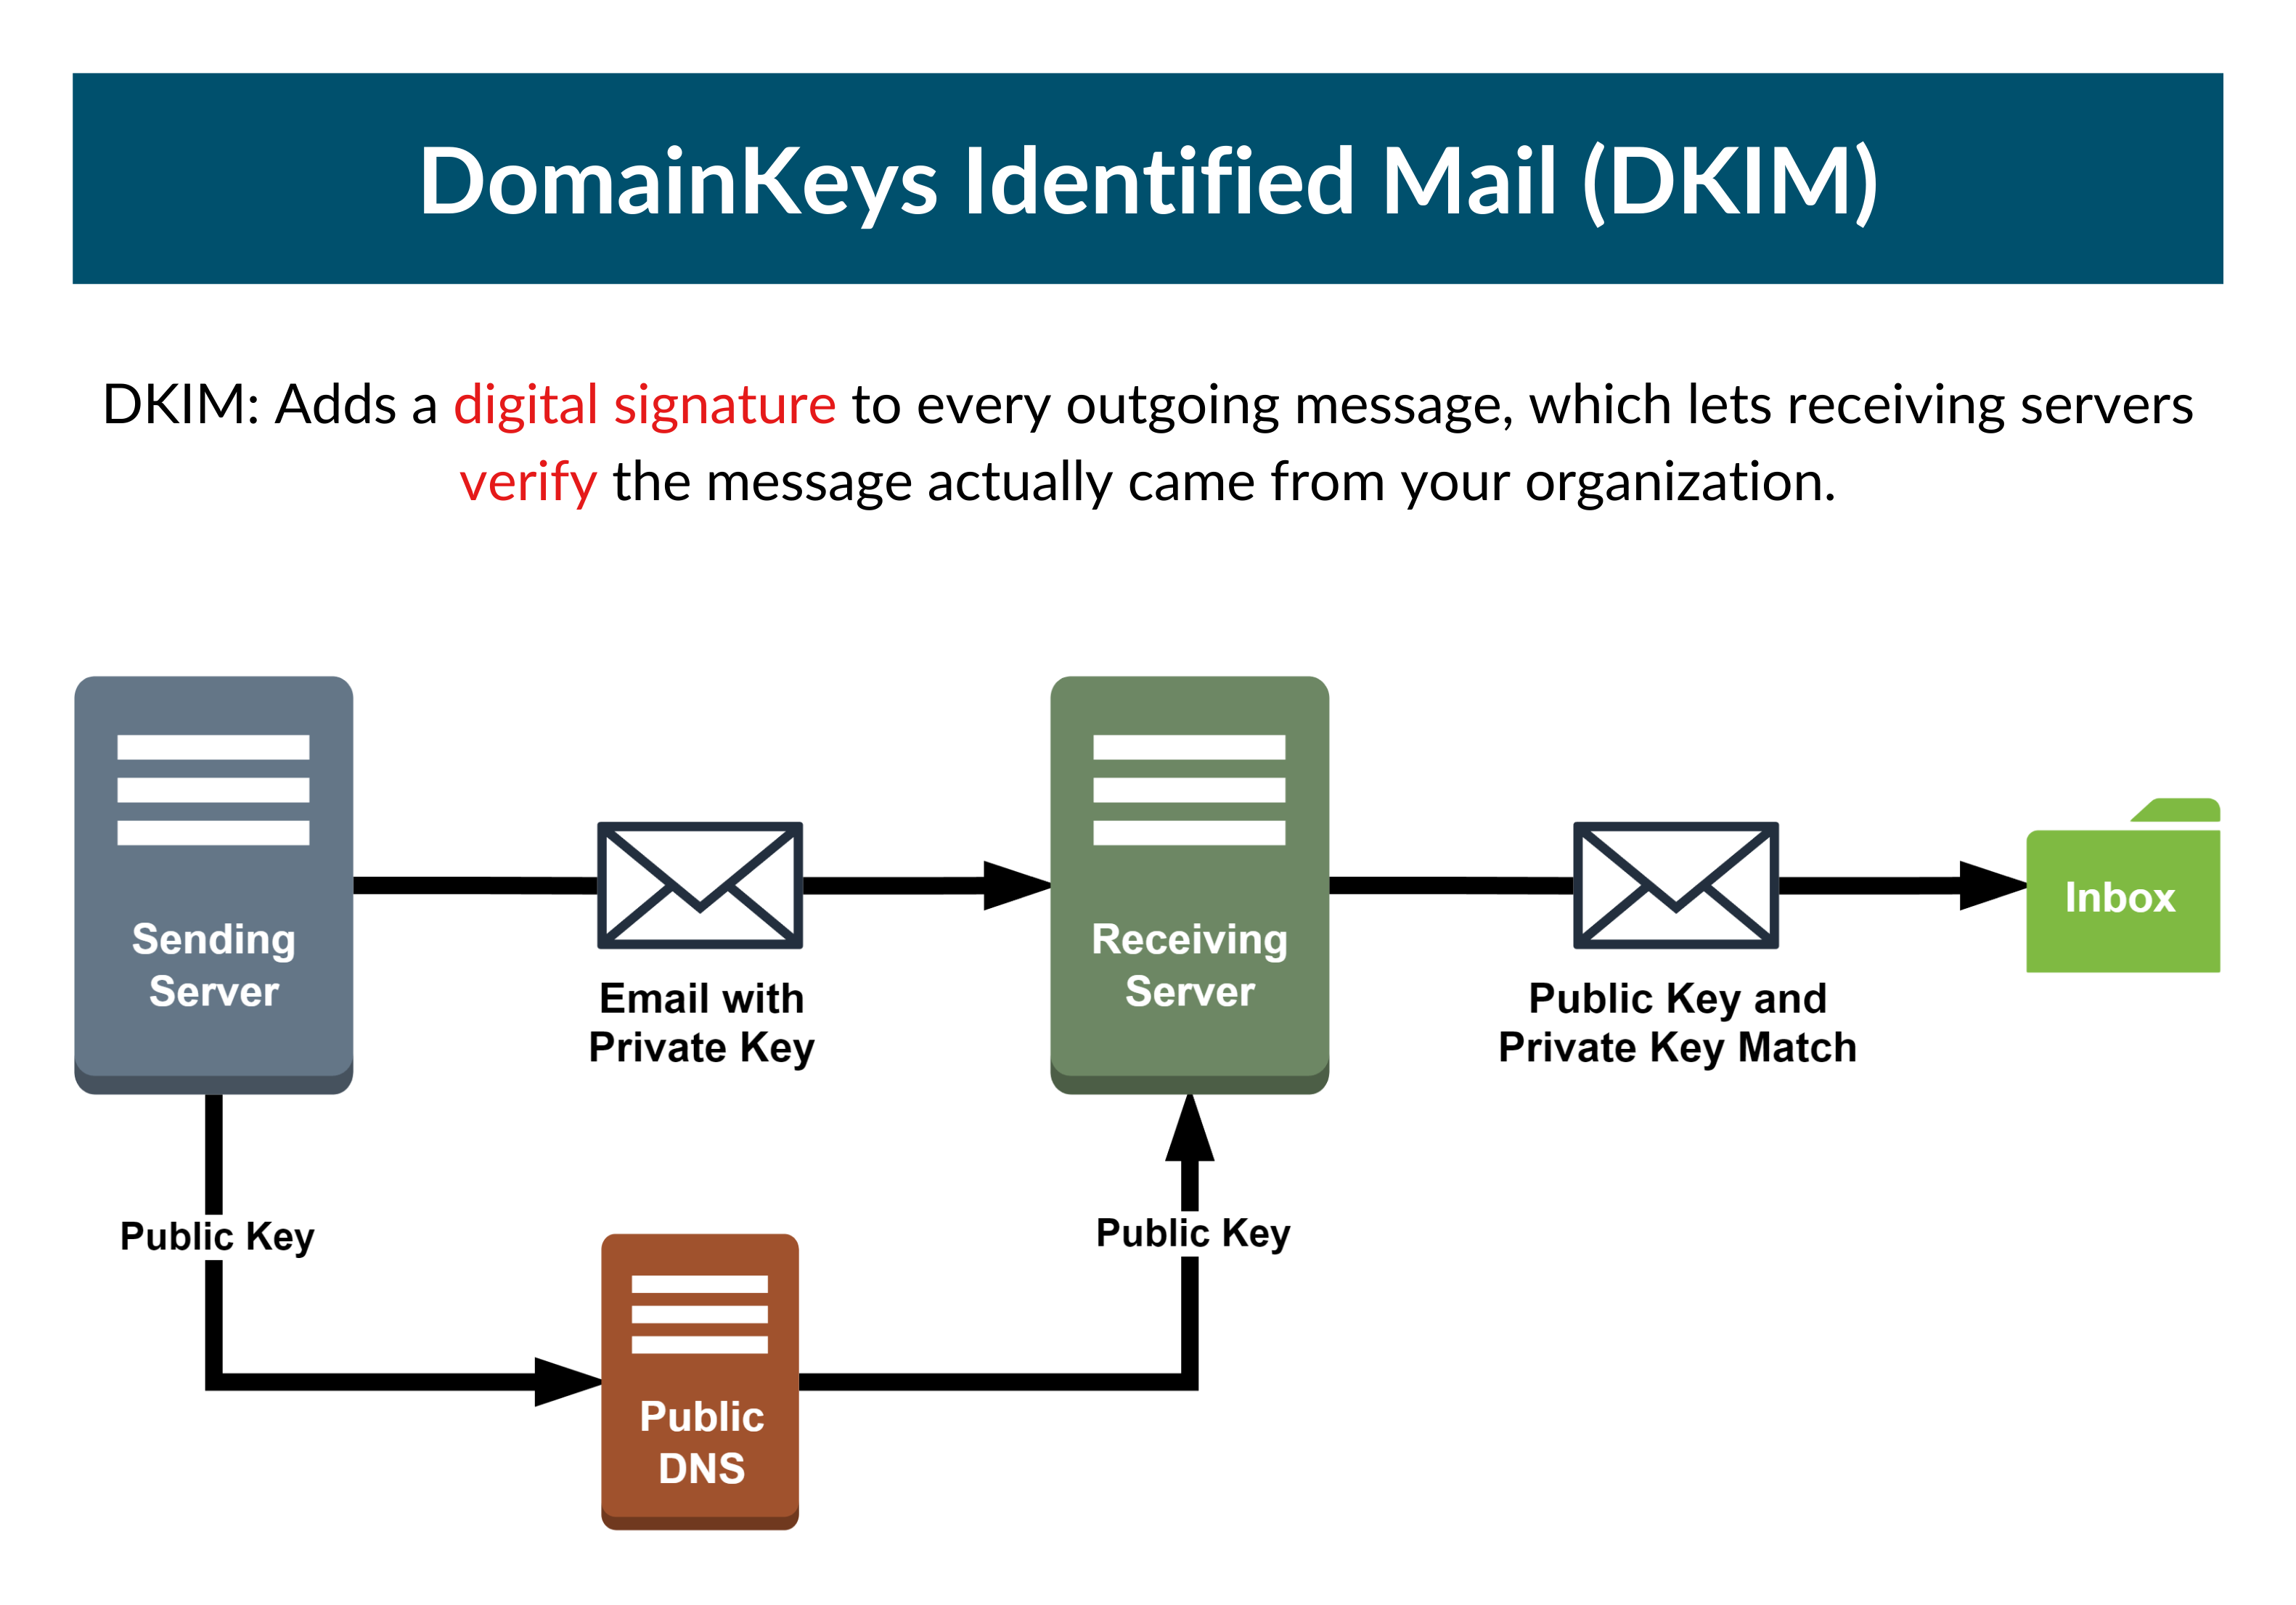
DKIM (DomainKeys Identified Mail) is an e-mail protection method that allows a domain to assume responsibility for e-mail delivery by signing messages so that other providers can verify it using cryptography.
Why Is DKIM Important?
One of the greatest methods to defend your users and customers against targeted e-mail assaults is to use DKIM. Without DKIM an altered message could be transmitted to the receiver.
DKIM uses a hash signature to validate the contents of the message. The hash is generated from different components of the e-mail including the domain, message body, etc., and is different for each sender. These components are determined at the time the message is delivered, and they cannot be changed afterward.
For those of you familiar with the other e-mail protection strategy, SPF, you know that using SPF records only guarantees that fake e-mail messages are not delivered to recipients, but it does not guarantee that the message was not altered. This shows the importance of using DKIM on top of SPF as a means to achieve better security.
A Word about Outgoing vs. Incoming E-mails
When talking about DKIM, system administrators usually refer to configuring DKIM for the outgoing messages of the server they are working on. However, it is also possible to set up DKIM validation on the server in a way that every incoming e-mail that does not have domain keys is automatically rejected. The former protects your reputation while the latter protects your users’ inboxes. A system administrator needs to equip the servers with both functionalities as they serve different purposes. We will see below how to enable both mechanisms.
Let’s start with the incoming e-mails.
How to Configure DKIM for Incoming E-mails in Carbonio CE
As we said, it is possible to configure DKIM validation on the Carbonio server. By configuring DKIM to check incoming e-mails any incoming e-mail that lacks domain keys is automatically rejected.
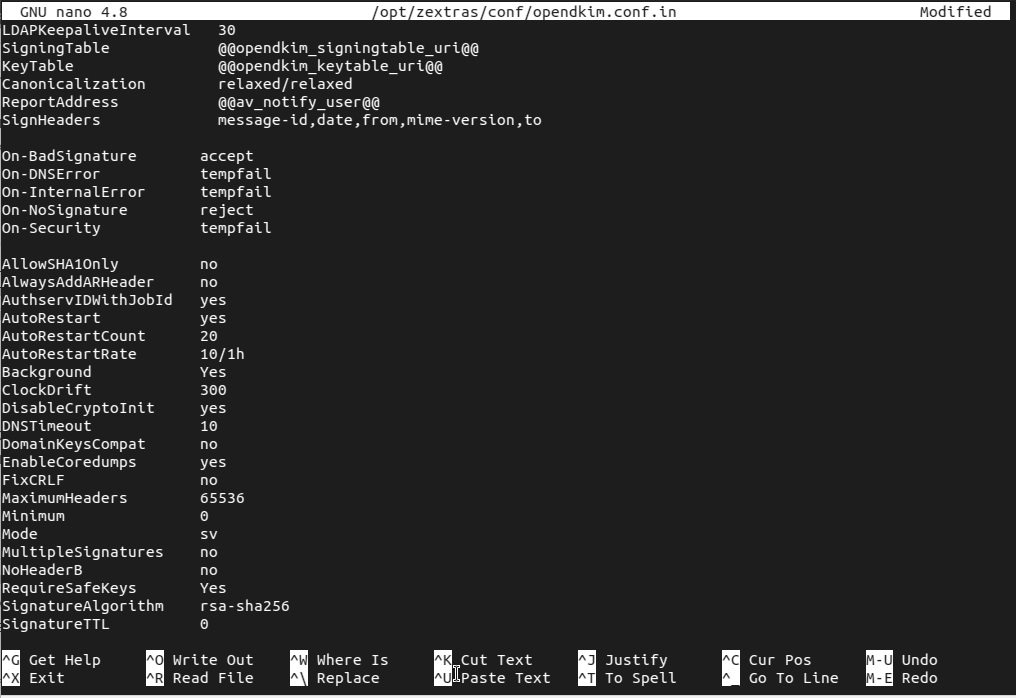
To do so we configure the OpenDKIM to check incoming e-mails as follows
- Open the
/opt/zextras/conf/opendkim.conf.inin your prefer text editor - Set the values for
On-NoSignatureandModerespectively torejectandsv - Restart the OpenDKIM service.
Let’s see this process in action:
su - zextras
/opt/zextras/conf/opendkim.conf.in
then set these two values as follows
On-NoSignature    reject
Mode              sv
Something like this
Then restart the OpenDKIM service. This configuration automatically rejects e-mails from senders that lack domain keys.
How to Configure DKIM for Outgoing E-mails in Carbonio CE
Configuring DKIM for outgoing e-mail signing improves the credibility of your messages sent by users on your servers. This happens as the receiving server can validate your e-mail DKIM record. For that to happen, we need to configure OpenDKIM to sign outgoing e-mails.
To set up DKIM in Carbonio, you must
- Step1: Install the
install libxml-simple-perlpackage - Step 2: Log into your
zextrasaccount and obtain your DKIM key (see the script below to generate the DKIM key) - Step 3: Add it to your DNS records
Let’s see this process in action:
Step 1: Installing libxml-simple-perl package
sudo apt-get install libxml-simple-perlAfter the package is installed on into your zextras account and run the script
Step 2: Obtaining your DKIM data
sudo su - zextras
/opt/zextras/libexec/zmdkimkeyutil -a -d example.tld
specifying the mail domain, not the server name in front of the parameter -d. In our case it’s example.tld
DKIM Data added to LDAP for domain example.tld with selector 0E9F184A-9577-11E1-AD0E-2A2FBBAC6BCB
 Public key to enter into DNS:
 0E9F184A-9577-11E1-AD0E-2A2FBBAC6BCB._domainkey IN TXT "v=DKIM1;k=rsa;
 p=MIGfMA0GCSqGSIb3DQEBAQUAA4GNADCBiQKBgQDY5CBg15nZ2vYnRmrNub6Jn6ghQ2DXQbQgOJ/E5IGziUYEuE2OnxkBm1h3jived21uHjpNy0naOZjLj0xLyyjclVy1chrhSbsGAhe8HLXUsdXyfRvNTq8NWLsUnMEsoomtJCJ
 /6LYWYU1whOQ9oKZVAwWHSovAWZpByqNMZmFg7QIDAQAB" ; ----- DKIM 0E9F184A-9577-11E1-AD0E-2A2FBBAC6BCB for example.tld
Understanding the Output
As shown above, you need this information
- The Selector which is the string before
._domainkey, in our case0E9F184A-9577-11E1-AD0E-2A2FBBAC6BCB, - The Version which is indicated with
v=in our casev=DKIM1, - The Key type which is indicated with
k=in our casek=rsa, - The Public key which is indicated with
p=in our casep=MIGfMA0GCSqGSIb3DQEBAQUAA4GNADCBiQKBgQDY5CBg15nZ2vYnRmrNub6Jn6ghQ2DXQbQgOJ/E5IGziUYEuE2OnxkBm1h3jived21uHjpNy0naOZjLj0xLyyjclVy1chrhSbsGAhe8HLXUsdXyfRvNTq8NWLsUnMEsoomtJCJ/6LYWYU1whOQ9oKZVAwWHSovAWZpByqNMZmFg7QIDAQAB
Step 3: Add your DKIM data to the DNS
Now it’s time to add the DKIM data obtained in the previous section to your DNS. To do so
- Access your DNS provider, for example, GoDaddy, Network Solutions, etc.
- Access your DNS Management based on your provider it can be something like name server management.
- Add a new TXT entry setting
Record Typeas TXT. - Insert your selector as
yourSelector._domainkeyin theHostnamefield. - Insert your version, key type, and public key, and separated them by
;likev=...;k=...;p=...in theTXT Valuefield. - Assign the Time to Live (TTL), for example, let’s use 3600s.
- Save the entry.
Updating the Key
If you needed to remove or update DKIM keys for a domain on your Carbonio CE servers you can use the following commands:
- First, you can display the current key using
/opt/zextras/libexec/zmdkimkeyutil -q -d example.tld- You can also remove the current key using
/opt/zextras/libexec/zmdkimkeyutil -r -d example.tld- and to update the current key use this command
/opt/zextras/libexec/zmdkimkeyutil -u -d example.tldNote: It is advised that the DKIM key be updated regularly, at least every 5-6 months. As a result, if someone obtains your DKIM key, they will be unable to misuse it.
Testing it All Out
The simplest way to verify an outgoing e-mail has been successfully signed is the annual approach. You can simply send an e-mail from your domain to a third-party address and examine the e-mail’s source code of the recipient and look for a line similar to this
tests=[DKIM_SIGNED=0.1, DKIM_VALID=-0.1, DKIM_VALID_AU=-0.1 ... dkim=pass (2048-bit key) header.d=example.tldYou may also send an e-mail to a Gmail account to see if your e-mail shows the Signed by entry on the e-mail metadata, indicating that Google has successfully detected your e-mail DKIM signature.
Alternatively, you can use tools such as nslookup:
nslookup -type=txt selector._domainkey.domainReplacing selector with your DKIM selector and domain with your domain name, for example, nslookup -type=txt 0E9F184A-9577-11E1-AD0E-2A2FBBAC6BCB._domainkey.example.tld,
Another way to do this is by using the dig like
dig txt selector._domainkey.domain
These tools look for your DKIM record to be present, if so you will see your record as v=DKIM1 ..., otherwise, there is an issue with obtaining the record, not showing v=DKIM1.
There are also online tools to check your DKIM records such as https://mxtoolbox.com/dkim.aspx or http://tools.wordtothewise.com/dkim. The only thing you have to do is to provide the domain name and your selector. If the DNS entry exists it will pass the test.