In this article, we will discuss one of the main e-mail protection strategies: DMARC, and show you how to implement it on your Carbonio CE servers properly. We will follow this with more articles about other common e-mail protection strategies.
What Is DMARC?
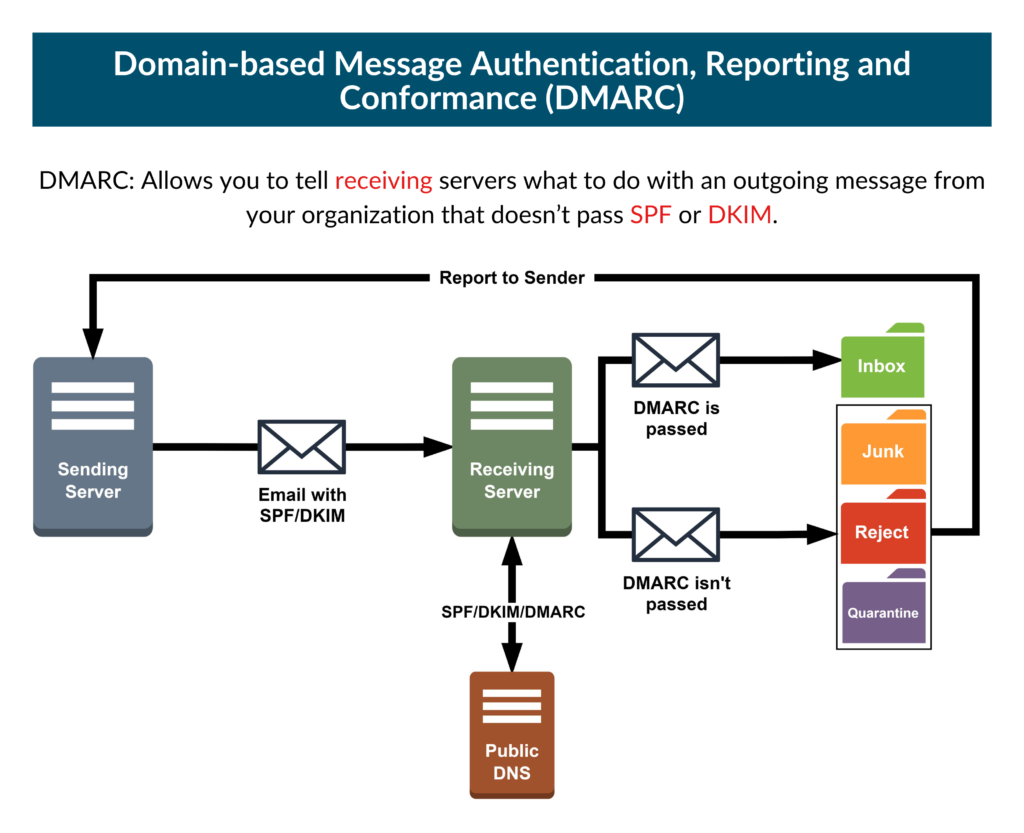
DMARC (Domain-based Message Authentication, Reporting, and Conformance) allows you to specify what to do with messages that do not pass SPF or DKIM. This protocol specifies how your e-mail servers should handle SPF and DKIM and protects your domain from fraudulent e-mails by allowing you to publish a policy in your DNS records that specifies whether DKIM or SPF (or both) should be used when sending e-mails from your domain.
Why Is DMARC Important?
As a system admin SPF, DKIM, and DMARC records are the best tools to prove the authentication and ingenuity of our e-mail. But at our real-life workplace, we find DMARC so complex to understand that we avoid talking about it.
In SPF and DKIM, the concepts are pretty much simple and implementations are straightforward. DMARC works on top of these two records. It closes the loopholes that can be exploited even after the implementation of SPF and DKIM records. So we guess DMARC offers these benefits:
- Strengthen SPF and DKIM implementation by explicitly
- Prevents exploitable loopholes in SPF and DKIM records
- Prevents mail spoofing by enforcing a match of return path and from address. If spoofing is detected, the recipient server will follow sending domains’ DMARC guidelines, even if the message passes both SPF and DKIM tests.
- Provides extensive reports about your domain’s performance
- Helps to identify the missing IPs that should be added to the SPF record.
At an early age, Microsoft and Yahoo tried to create some alternatives (i.e. sender-id) but eventually dropped those and fully supported DMARC.
How to Configure DMARC in Carbonio CE
Setting up DMARC for your Carbonio CE servers has two broad steps:
- Creating the DMARC record
- Adding the DMARC record to the DNS
Let’s take a quick look into these steps and later we will discuss them better in the last section; De-cluttering DMARC Record.
Creating the DMARC Record
To create your DMARC record, you will need first to know a few tags and their functions. Here is a short list of the most used tags in a DMARC record:
| Tag Name | Purpose | Example |
|---|---|---|
| v | Protocol version | v=DMARC1 |
| pct | Percentage of messages subjected to filtering | pct=20 |
| ruf | Reporting URI for forensic reports | ruf=mailto:authfail@example.com |
| rua | Reporting URI of aggregate reports | rua=mailto:aggrep@example.com |
| p | Policy for organizational domain | p=quarantine |
| sp | Policy for subdomains of the OD | sp=reject |
| adkim | Alignment mode for DKIM | adkim=s |
| aspf | Alignment mode for SPF | aspf=r |
Remarks: It is very easy to set up a DMARC record even without knowing it properly. But most of the time sysadmins ignore the crucial part and that is understanding it. That’s what we will do in this article and the next following article.
In this section, we will chronologically go ahead so you understand the discussion better and apply the part that is more relatable to your case. We will have the discussions divided into separate stages so you can relate to your positional stage and understand what you have to do next.
Stage 1: Constructing the basic structure
Let’s assume, we have published SPF and DKIM records for our domain example.com. As they are working properly, now we need to publish the DMARC record.
We will start with the basic structure:
Domain: example.com

Hostname = _dmarc.example.com
v=DMARC1; p=none;
as explained before:
Here,
- v = DMARC1 is the version and should be always placed in the first place. Other parameters have no mandatory position.
- p = policy; It defines what happens when a message fails to meet DMARC criteria. Possible values are:
- p = none; If a message fails to pass, take no action
- p = quarantine; If a message fails to pass, deliver it to the recipient’s JUNK or SPAM folder.
- p = reject; If a message fails to pass, reject the message.
Let’s improve the basic structure a little bit more:
Domain: example.com

Hostname = _dmarc.example.com
v=DMARC1; p=none; rua=mailto:dmarc@example.com;
Here, rua = Aggregate report.
It means, all the recipient server that has recently (Within 24-48 Hours) received e-mails from the domain example.com will have an aggregate report in form of XML format via e-mail to dmarc@example.com. It is an optional tag. Also, not all but most of the recipient servers do send the reports. As you are going to get lots of e-mails at this address, it is better to have a separate dedicated e-mail for this purpose.
Now, what if you need this rua report to another address on a different domain?
Domain: example.com

Hostname = _dmarc.example.com
v=DMARC1; p=none; rua=mailto:information@testdomain.com;
[So basically, you are requesting recipient servers to send the rua report to information@testdomain.com]
To make this happen, you also need to add a TXT record in the DNS of testdomain.com.
That is:
Domain: testdomain.com

Hostname = example.com._information._dmarc.testdomain.com
v=DMARC1;
This record will allow testdomain.com to receive DMARC reports (rua) of example.com
Let’s add another optional tag to our DMARC record:
Domain: example.com

Hostname = _dmarc.example.com
v=DMARC1; p=none; rua=mailto:dmarc@example.com; ruf=mailto:dmarc@example.com;
Here, ruf = Forensic report.
That means, with this policy all recipient server is requested to provide a copy of emails that fails to pass SPF, DKIM, or Spoof Checking. But it is up to the recipient server whether it is will send an entire copy of that email or just the header of the email. It is also an optional tag.
This tag is avoided by sysadmins for privacy reasons.
So far we built a basic structure of a DMARC record. That is:
Domain: example.com

Hostname = _dmarc.example.com
v=DMARC1; p=none; rua=mailto:dmarc@example.com; ruf=mailto:dmarc@example.com;
Now initially, the value of p can be set as none. But, our goal is to change the value from none to quarantine to reject. The progress of this transition will depend on the mentioned reports.
Stage 2: Moving Into The Advanced Territory
We finished stage 1 with the basic structure. Now we will add some additional tags to our record to enhance its performance.
Let’s add a tag that will set the policy for the subdomains of example.com.
Domain: example.com

Hostname = _dmarc.example.com
v=DMARC1; p=none; rua=mailto:dmarc@example.com; ruf=mailto:dmarc@example.com; sp=none;
Here,
- sp = policy for subdomains; It defines what happens when a message fails to meet DMARC criteria. Possible values are:
- sp = none; If a message fails to pass, take no action
- sp = quarantine; If a message fails to pass, deliver it to the recipient’s JUNK or SPAM folder.
- sp = reject; If a message fails to pass, reject the message.
But if no “sp” tag is mentioned then the “p” tag will be enforced to all subdomains of example.com.
Let’s add another tag to the DMARC record:
Domain: example.com

Hostname = _dmarc.example.com
v=DMARC1; p=none; rua=mailto:dmarc@example.com; ruf=mailto:dmarc@example.com; sp=none; fo=1;
Here, fo means failure options. Value can be:
- fo = 0; When SPF & DKIM & Spoof Checking fails, a DMARC report is requested
- fo = 1; When SPF/DKIM/Spoof Checking fails, a DMARC report is requested
- fo = d; When DKIM checking fails, a DMARC report is requested
- fo = s; When SPF checking fails, a DMARC report is requested
This DMARC record is requested from the recipient server that receives the mail from example.com and fails any one of these checks/tests.
Note: DMARC Alignment test is another important aspect that a system administrator should know about. In order to read more about the DMARC Alignment test, please refer to DMARC Alignment Test and How It Helps You Prevent Spoofing on Yor E-mail Servers.
Stage 3: The Desired Target
Let’s add another tag to our DMARC record:
Domain: example.com
Hostname = _dmarc.example.com
v=DMARC1; p=reject; rua=mailto:dmarc@example.com; ruf=mailto:dmarc@example.com; sp=none; pct=80;
Here, pct (optional, default is 100) specifies the percentage of emails to which the DMARC policy is to be applied. For example, this DMARC record requests to apply the reject policy to 80% of the emails:
Another useful tag is:
Domain: example.com

Hostname = _dmarc.example.com
v=DMARC1; p=reject; rua=mailto:dmarc@example.com; ruf=mailto:dmarc@example.com; sp=none; pct=80; ri=172800;
ri (optional, default is 86400) specifies the interval between aggregate reports in seconds. DMARC aggregate reports are sent daily by default.
So finally, our DMARC record will be:
Domain: example.com

Hostname = _dmarc.example.com
v=DMARC1; p=reject; rua=mailto:dmarc@example.com; ruf=mailto:dmarc@example.com; sp=reject; pct=80; ri=172800;
Our desired target is to move the policy from none to quarantine to reject. It may take time, but in the end, it will benefit your cause.
Adding the DMARC Record to the DNS
As you learned how to construct a DMARC record now it’s time to add it to DNS. To add the record you created in the last section, you need to access your DNS provider and follow the below instructions:
- Access your DNS provider such as GoDaddy, Network Solutions, etc.,
- Access the DNS Management panel or something similar such as name server management,
- Add a new TXT entry,
- Set the Record Type to TXT,
- Insert
_dmarcin the Hostname field, - Insert your DMARC record created in the previous section in the TXT Value field,
- Assign the Time to Live (TTL), for example, let’s use 3600s,
- Save the entry.
This is it for now.
Don’t miss the following article. It is going to be more interesting, informative, and useful. Don’t you wanna see the aftermath of your DMARC implementation?
😊