For additional guidance, check out our community articles detailing the process of migrating from your current platform to Carbonio CE.
For enterprise-level requirements and advanced features, consider checking out Zextras Carbonio – the all-in-one private digital workplace designed for digital sovereignty trusted by the public sector, telcos, and regulated industries.
In modern days, data security is prioritized with great concern. Most system admins are concerned with their email server security from both inside/outside threats. As threats evolve, so does the concept of security. In this guide, you will learn a different aspect of email server security. What is an SSL certificate and how does it help to understand and deal with that aspect. Also, you will learn how to properly install an SSL certificate on your Zimbra server.
We will keep this discussion as simple as we can. So let’s begin.
Most of the time we care about the security of our infrastructure. But it is possible that data breaches can occur outside of our network. Take a look at below image:
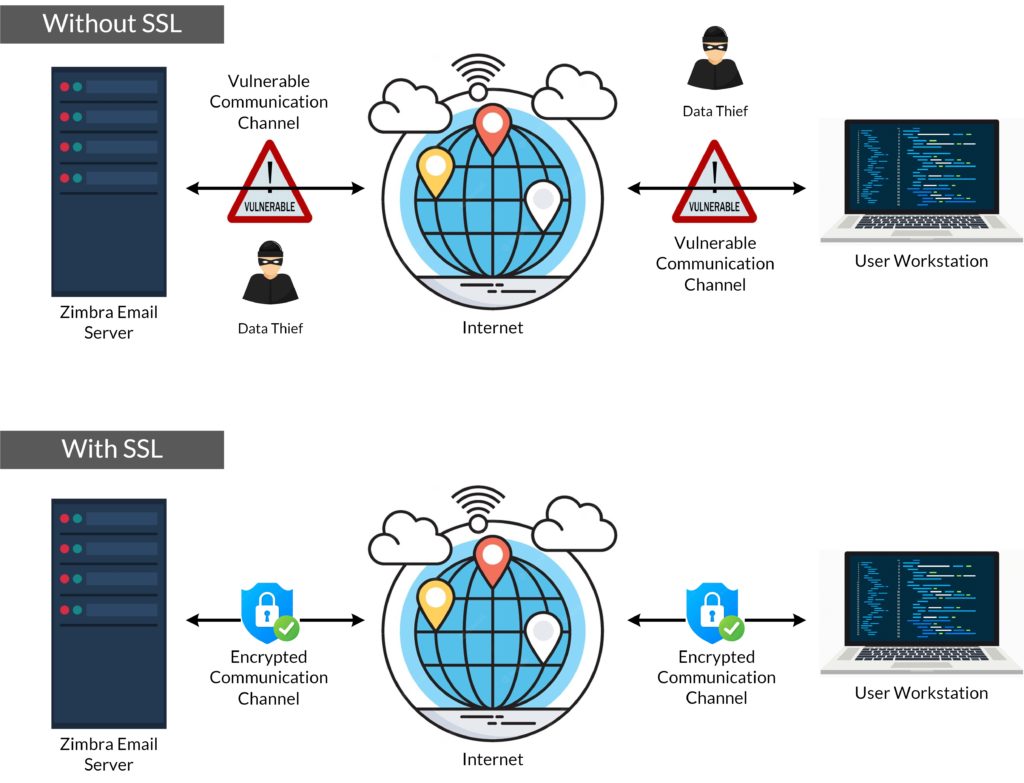
So you know securing the communication is as important as securing the infrastructure (i.e Server.) To keep the channel/communication protected, we can use encryption methods. That’s where SSL helps us.
What Is An SSL Certificate?
An SSL is a digital certificate that authenticates a web page or server’s identity. It also encrypts the communication between the server and the users. So when you open your laptop and access your webmail if your email server has an SSL certificate deployed in it, you can consider that a secure connection has been established between your laptop browser and your email server.
Generally, companies and organizations add SSL certificates to their websites to secure online transactions and keep customer information private and secure. But it is strongly recommended to deploy the SSL certificate in your email server too.
The process with SSL works like this:
- A browser or server attempts to connect to a website (i.e., a web server) secured with SSL.
- The browser or server requests that the web server identifies itself.
- The web server sends the browser or server a copy of its SSL certificate in the response.
- The browser or server checks to see whether it trusts the SSL certificate. If it does, it signals this to the webserver.
- The web server then returns a digitally signed acknowledgement to start an SSL encrypted session.
- Encrypted data is shared between the browser or server and the webserver.
So let’s proceed to the installation steps.
In this guide, we will use the Comodo Positive SSL certificate to demonstrate the steps.
Some Prerequisites Before The Installation
As you are going to install the SSL certificate, I assume you have completed below mentioned tasks:
- Generated a CSR in your Zimbra server
- Issued the required SSL certificate from the SSL Provider
Now, let’s understand the scenario.
We have generated the CSR therefore we have 2 files on /opt/zimbra/ssl/zimbra/commercial/ and they are;
- commercial.csr
- commercial.key
We have received the SSL certificate from the SSL certificate provider and the bundle contains 4 (four) files such as:
- mail.domain.com.crt
- AddTrustExternalCARoot.crt
- SectigoRSADomainValidationSecureServerCA.crt
- USERTrustRSAAddTrustCA.crt
We will use these 4 files to construct the certificate chain as per their required order. We will validate the chain with the commercial key and if the validation is successful then we will proceed to the installation phase.
SSL Installation
Steps-1
Upload all SSL certificate files to the server (/opt/zimbra/ssl/zimbra/commercial/). So you have 6 (six) files at the location /opt/zimbra/ssl/zimbra/commercial/. And they are:
- commercial.csr
- commercial.key
- mail.example.com.crt
- AddTrustExternalCARoot.crt
- SectigoRSADomainValidationSecureServerCA.crt
- USERTrustRSAAddTrustCA.crt
Step-2
Make sure Zimbra have ownership of all these files.
-rw-r----- 1 zimbra zimbra 5644 Jun 10 23:40 commercial.csr
-rw-r----- 1 zimbra zimbra 7754 Jun 10 23:44 commercial.key
-rw-r----- 1 zimbra zimbra 7754 Jun 10 23:48 mail.domain.com.crt
-rw-r----- 1 zimbra zimbra 7754 Jun 10 23:52 AddTrustExternalCARoot.crt
-rw-r----- 1 zimbra zimbra 7754 Jun 10 23:56 SectigoRSADomainValidationSecureServerCA.crt
-rw-r----- 1 zimbra zimbra 7754 Jun 10 00:00 USERTrustRSAAddTrustCA.crt
If permissions are not set properly, then use chown command to set the ownership properly.
Format:
chown zimbra:zimbra <file_name>

Example:
chown zimbra:zimbra USERTrustRSAAddTrustCA.crt
Steps-3
We need to create 2 (two) more files using these files. The composition will be as follows:
| File name | Content as per order | No. of Keys | Total No. of Keys |
| SectigoRSADomainValidationSecureServerCA.crt | 1 | ||
| commercial_ca.crt | USERTrustRSAAddTrustCA.crt | 1 | 3 |
| AddTrustExternalCARoot.crt | 1 |
| File name | Content as per order | No. of Keys | Total No of keys |
| mail.domain.com.crt | 1 | ||
| commercial.crt | SectigoRSADomainValidationSecureServerCA.crt | 1 | 4 |
| USERTrustRSAAddTrustCA.crt | 1 | ||
| AddTrustExternalCARoot.crt | 1 |
So now follow the below instructions:
cat SectigoRSADomainValidationSecureServerCA.crt USERTrustRSAAddTrustCA.crt AddTrustExternalCARoot.crt > commercial_ca.crt

cat mail.example.com.crt SectigoRSADomainValidationSecureServerCA.crt USERTrustRSAAddTrustCA.crt AddTrustExternalCARoot.crt > commercial.crt

[If you read these files now, you will find them in below mentioned format]
 -----BEGIN CERTIFICATE-----
xxxxxxxxxxxxxxxxxxxxxxxxxxxxxx
xxxxxxxxxxxxxxxxxxxxxxxxxxxxxx
-----END CERTIFICATE-----
-----BEGIN CERTIFICATE-----
xxxxxxxxxxxxxxxxxxxxxxxxxxxxxx
xxxxxxxxxxxxxxxxxxxxxxxxxxxxxx
-----END CERTIFICATE-----
Now we have 8 (eight) files at the location /opt/zimbra/ssl/zimbra/commercial/. And the files are:
- -rw-r—– 1 zimbra zimbra 5644 Jun 10 23:40 commercial.csr
- -rw-r—– 1 zimbra zimbra 7754 Jun 10 23:44 commercial.key
- -rw-r—– 1 zimbra zimbra 6842 Jun 10 23:48 mail.example.com.crt
- -rw-r—– 1 zimbra zimbra 6623 Jun 10 23:52 AddTrustExternalCARoot.crt
- -rw-r—– 1 zimbra zimbra 2356 Jun 10 23:56 SectigoRSADomainValidationSecureServerCA.crt
- -rw-r—– 1 zimbra zimbra 8863 Jun 11 00:00 USERTrustRSAAddTrustCA.crt
- -rw-r—– 1 zimbra zimbra 4526 Jun 11 00:30 commercial_ca.crt
- -rw-r—– 1 zimbra zimbra 2263 Jun 11 00:40 commercial.crt
You can verify the chain order after the installation from various online websites. SSL LAB is one of them.
Step-4
Now we will perform the 2 (two) most important tasks of this installation process.
[Verify commercial.crt commercial_ca.crt with commercial.key]
/opt/zimbra/bin/zmcertmgr verifycrt comm /opt/zimbra/ssl/zimbra/commercial/commercial.key /opt/zimbra/ssl/zimbra/commercial/commercial.crt /opt/zimbra/ssl/zimbra/commercial/commercial_ca.crt

We should get the matching notification and as OK.
Example output:
 ** Verifying '/opt/zimbra/ssl/zimbra/commercial/commercial.crt' against '/opt/zimbra/ssl/zimbra/commercial/commercial.key'
Certificate '/opt/zimbra/ssl/zimbra/commercial/commercial.crt' and private key '/opt/zimbra/ssl/zimbra/commercial/commercial.key' match.
** Verifying '/opt/zimbra/ssl/zimbra/commercial/commercial.crt' against '/opt/zimbra/ssl/zimbra/commercial/commercial_ca.crt'
Valid certificate chain: /opt/zimbra/ssl/zimbra/commercial/commercial.crt: OK
Keep in mind that if the verification fails with any warning/notification, you should not consider proceeding with the installation process. As our verification results as successful, we are proceeding to the installation task.
Step-5
Execute the below-mentioned command to install the certificate.
/opt/zimbra/bin/zmcertmgr deploycrt comm /opt/zimbra/ssl/zimbra/commercial/commercial.crt /opt/zimbra/ssl/zimbra/commercial/commercial_ca.crt

[Is this case, we will get output as mentioned below:]

** Keeping first certificate in '/opt/zimbra/ssl/zimbra/commercial/commercial.crt'
** Verifying '/opt/zimbra/ssl/zimbra/commercial/commercial.crt' against '/opt/zimbra/ssl/zimbra/commercial/commercial.key'
Certificate '/opt/zimbra/ssl/zimbra/commercial/commercial.crt' and private key '/opt/zimbra/ssl/zimbra/commercial/commercial.key' match.
** Verifying '/opt/zimbra/ssl/zimbra/commercial/commercial.crt' against '/opt/zimbra/ssl/zimbra/commercial/commercial_ca.crt'
Valid certificate chain: /opt/zimbra/ssl/zimbra/commercial/commercial.crt: OK
** Appending ca chain '/opt/zimbra/ssl/zimbra/commercial/commercial_ca.crt' to '/opt/zimbra/ssl/zimbra/commercial/commercial.crt'
** Importing cert '/opt/zimbra/ssl/zimbra/commercial/commercial_ca.crt' as 'zcs-user-commercial_ca' into cacerts '/opt/zimbra/common/lib/jvm/java/lib/security/cacerts'
** NOTE: restart mailboxd to use the imported certificate.
** Saving config key 'zimbraSSLCertificate' via zmprov modifyServer

mail.example.com...ok
** Saving config key 'zimbraSSLPrivateKey' via zmprov modifyServer mail.example.com...ok
** Installing imapd certificate '/opt/zimbra/conf/imapd.crt' and key '/opt/zimbra/conf/imapd.key'
** Copying '/opt/zimbra/ssl/zimbra/commercial/commercial.crt' to '/opt/zimbra/conf/imapd.crt'
** Copying '/opt/zimbra/ssl/zimbra/commercial/commercial.key' to '/opt/zimbra/conf/imapd.key'
** Creating file '/opt/zimbra/ssl/zimbra/jetty.pkcs12'
** Creating keystore '/opt/zimbra/conf/imapd.keystore'
** Installing ldap certificate '/opt/zimbra/conf/slapd.crt' and key '/opt/zimbra/conf/slapd.key'
** Copying '/opt/zimbra/ssl/zimbra/commercial/commercial.crt' to '/opt/zimbra/conf/slapd.crt'
** Copying '/opt/zimbra/ssl/zimbra/commercial/commercial.key' to '/opt/zimbra/conf/slapd.key
Step-6
Finally, when the certificate installation is successful, we shall restart Zimbra services.
Step-7
In the end, we can check the certificate status from any reputed browser (i.e. Firefox, Chrome, Opera etc.)
It was a long discussion. But you have made it through. I Hope, the above-mentioned guide will help you in your daily tasks.
If you have interest, you can read more details about the SSL Certificate here.
That’s all for today.