For additional guidance, check out our community articles detailing the process of migrating from your current platform to Carbonio CE.
For enterprise-level requirements and advanced features, consider checking out Zextras Carbonio – the all-in-one private digital workplace designed for digital sovereignty trusted by the public sector, telcos, and regulated industries.
Speaking of email security and spam, there are many factors to consider as we have seen in the incoming and outgoing mail protection best practices articles. Surely, however, we can think, as the first effective filter against spam, to the Realtime Blackhole List (RBL) services.
Realtime Blackhole List
RBL services are all arranged almost in the same way. We have a list of “bad” IP addresses accessed in real time via DNS.
Mail servers using Realtime Blackhole List, at the time they receive the next message, query the service (or the various RBL services) to find out whether the sender’s IP address is “bad” or not. Based on the response, the message is either accepted or rejected.
Most mail servers today can work with RBL services.
How to configure RBL in Zimbra
In Zimbra, there are essentially two ways to configure RBLs. Use the GUI or the CLI.
Admin Console
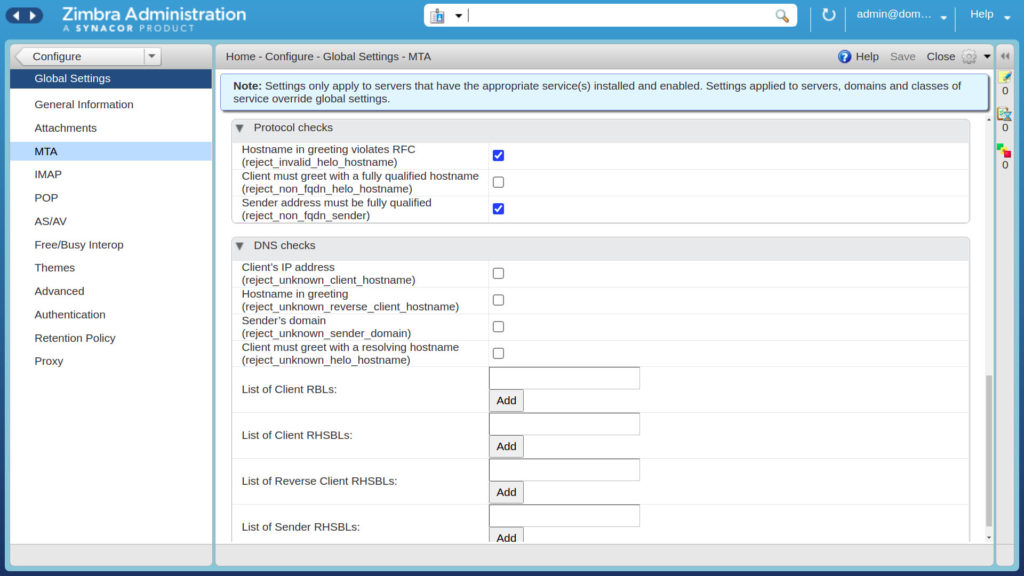
To configure RBLs via GUI, once logged into your Administration Console, you will need to go to Configure -> Global Settings and select “MTA“. From here, by scrolling down the various options, you will come to see, as in the image, the “DNS checks” options. Here you can select what to block and add the RBLs of your choice.
Command Line Interface
Now we are going to see how to configure RBLs via CLI. We are going to use zmprov commands, so first of all you need to switch to Zimbra user, using the command:
su - zimbraThen, you can check for existing policies in place, using the command zmprov getAllConfig:
$ zmprov gacf | grep zimbraMtaRestrictionAfter doing that, you can start adding RBLs and other options if needed, like, for example, “reject_unkown_helo_hostname” or “reject_unknown_client_hostname”, the same you can find in GUI interface MTA configuration, using the zmprov modifyConfig command:
zmprov mcf +zimbraMtaRestriction "reject_rbl_client <RBL Address>"You can add multiple RBLs at a time.
RBLs used by Zimbra
Here we want to give you some RBLs used by Zimbra, so you can choose which one(s) to add.
RBLs:
zen.spamhaus.org psbl.surriel.com b.barracudacentral.org bl.spamcop.netClient RHSBLs:
dbl.spamhaus.org multi.uribl.com multi.surbl.org rhsbl.sorbs.netSender RHSBLs:
multi.uribl.com multi.surbl.org rhsbl.sorbs.net dbl.spamhaus.orgReverse Client RHSBLs:
dbl.spamhaus.orgBlacklist and Whitelist in Zimbra
With Zimbra Collaboration Server 8.5 and later, you can blacklist IP addresses to connect to Postfix.
This is especially useful in DOS attack and targeted spam scenarios. Although RBLs are typically used by clients to prevent spammers from flooding their accounts with spam, this is not always enough to solve the problem. This is especially true when your server is already under attack. That’s why starting with version 8.5 of ZCS it is possible to create disk databases, which allows you to maintain a specific blacklist of IP addresses.
Create a Whitelist
Now we are going to see how to create a Whitelist of trusted IP addresses in Zimbra. First of all, let’s create the postfix_rbl_override file
nano /opt/zimbra/conf/postfix_rbl_overrideThen we are going to add the the trusted IP addresses to the created file.
123.456.789.10 OK
321.654.987.01 OK
With that done, run postmap command to save the settings in postfix. We execute this command from the Zimbra user.
postmap /opt/zimbra/conf/postfix_rbl_overrideLast step is to execute the zmprov command to apply these changes to the Zimbra Collaboration Server.
zmprov mcf +zimbraMtaRestriction 'check_client_access lmdb:/opt/zimbra/conf/postfix_rbl_override'Please note that postmap needs to be run every time after change.
Create a Blacklist
In order to create a Blacklist, the first step, as for the whitelist, is to create the postfix_blacklist file:
nano /opt/zimbra/conf/postfix_blacklistThen you have to add the blocked IP addresses to the created file.
123.456.789.10 REJECT
321.654.987.01 REJECT
Now, run the postmap command to save the settings in postfix. We execute this command from the zimbra user.
postmap /opt/zimbra/conf/postfix_blacklistWhen finished, you have to execute the zmprov command to apply these changes to the Zimbra Collaboration Server.
zmprov mcf +zimbraMtaRestriction 'check_client_access lmdb:/opt/zimbra/conf/postfix_blacklist'Please note that postmap needs to be run every time after change.