For additional guidance, check out our community articles detailing the process of migrating from your current platform to Carbonio CE.
For enterprise-level requirements and advanced features, consider checking out Zextras Carbonio – the all-in-one private digital workplace designed for digital sovereignty trusted by the public sector, telcos, and regulated industries.
Zimbra Web Client is a complete messaging and collaboration application that offers reliable email, address books, calendar, task lists and web document creation capabilities. That sounds great !
But now that you have such a wonderful application in your hands, probably you’ll also want to know how to use it and how to do all the things you would like to. Well … Whether you’re at home or in the office, we’re here to help you and show you how the Zimbra web client works. So, get comfortable and let’s start our journey.
Every travel starts from the beginning, so in the first stage we are going to discover how to set up and customize your mail account and how the interface works, starting from the first thing that you will see on your screen. The log in panel.
SIGN IN
Here we are. The first operation we have to do is for sure to enter the web client logging in with our account. It is a quite simple operation, and we are going to see it in some easy steps:
- In you browser window, just type the URL related to your domain mail (usually it is provided by your mail administrator). It should be like: http(s)://mail.yourdomain.com
- You will be faced with the log in screen. All you have to do is to enter your mail address (eg. yourname@yourdomain.com ) and your password
- You can eventually choose to stay logged in until the session expires or you sign out. To do that, select the “Stay signed in” option.
- Click “Sign In” button
SIGN OUT
It’s really important to sign out when you are not using your computer (even if I always suggest to turn it off or lock it with key combinations “windows key + L” if you are leaving it with other people around) so that nobody else can access to your email account.
TIP: Please remember that if you decide to save your mail credential in web browser for future fast log in, even if you log out but leave your PC turned on and unlocked, anyone can easily enter your webmail client by auto-completing login form
To manually sign out all you have to do is to go in the upper right corner of your client and select “Sign Out” after clicking on your name.
Your session could also automatically end logging you out after a specific timeout time. In this situation, if you want to get back to your mail client, you simply have to log in again.
WEB CLIENT PANEL
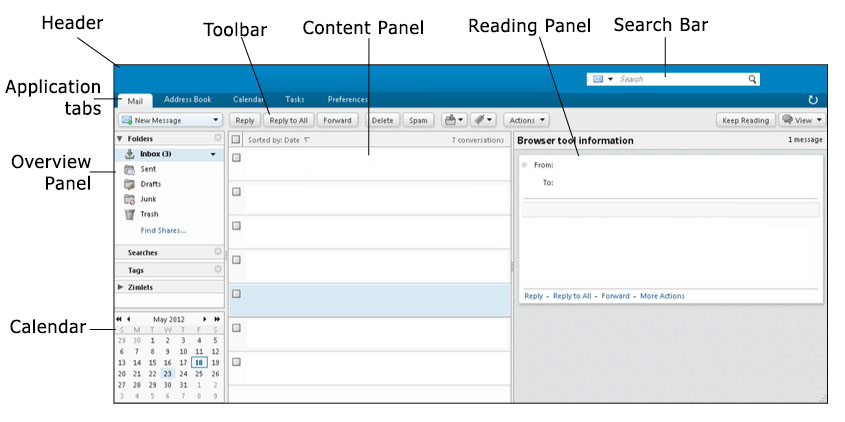
1 shows you the mail panel. This is your basic working area. Let’s see some details:
- Header – The header displays the logo on the left side, while on the right side we have the search box and your user name (the one you are logged in with). Remember that by clicking on it a drop down menu will appear letting you choose between some options.
- Application Tabs – Here you can find, listed in tabs, all the applications available, such as mail itself, calendar, address book …
- Overview Panel – This panel contains some elements. Folders: The basic folders like inbox, sent, draft … as well as those you eventually created. Searches: the searches you made and saved for further use. Tags: any kind of tag you created. Zimlets: Links to third party applications created within your mailbox to be integrated.
- Calendar – This is optional and can be disabled in “preferences”. It just shows you a mini version of calendar
- Toolbar – This bar shows you the action that can be done for the application in use
- Content Panel – This is the area where content are shown. It vary depending on what are you doing.
- Reading Panel – Here is where the content of your mail message is displayed
- Search Bar – Use it to search anything in your mailbox
CUSTOMIZATIONS
Now that we have seen how the web client looks like, and we know how to log in and log out, is time to learn how to personalize some aspects of our account and client.
TIP: Passing your mouse cursor over items, you’ll get a description about the item.
CHANGE PASSWORD
You may want to change your password for different reasons. And, I suggest, it is a good practice also to to it regularly every 1 to 3 months at least. To do this operation we can follow these simple steps:
- Go to Preferences → General
- Click “Change Password” under sign in → Password
- Enter and confirm your new password.
Remember to follow the system’s security policy when you create a new password.
Click on “change password” and “save”
Under “Preferences → General” there are also other interesting option to personalize your account:
CHANGE THE THEME
There are different themes you can choose from, to customize the color scheme and the appearance of Zimbra Web Client. To make those changes, under “Preferences → General” go to Appearance section, select the theme you want to use and then click on “save”
TIP: Did you know that Zextras designed a modern and free theme for Zimbra? If you’re curious to give it a try, find out how to install it by reading this article
CHANGE FONT SIZE
You can decide to change font and size:
In Appearance (under preferences → general) you will find a “FONT” drop down menu. Selecting it you can choose the font type. Below that you will see the options to change display font size and print font size.
When you finish, just click on “save”
CHANGE YOUR DEFAULT TIME ZONE
The time zone used in Zimbra Web Client for your messages and calendar can be different from the one of your computer, and you may want to change it.
In Preferences → General, you will find a drop down menu named “Time Zone” under Time Zone and Language section. Click on it and select the one you want. When finished save your changes.
CHANGE THE LANGUAGE
To change the display text language, simply go to the same panel where you changed time zone, and select “Language” drop down menu. Choose your preferred language and then save your changes.
MOVING AND RESIZING READING PANEL
You can change the position of the reading panel by clicking on “view” in upper right corner of the toolbar. Select “Reading Pane” from the drop down menu and choose your preferred option.
To change the size, you simply have to click on the bar separating the panes and drag on it.