For additional guidance, check out our community articles detailing the process of migrating from your current platform to Carbonio CE.
For enterprise-level requirements and advanced features, consider checking out Zextras Carbonio – the all-in-one private digital workplace designed for digital sovereignty trusted by the public sector, telcos, and regulated industries.
Hi and welcome to a new chapter in the Mail Management user guide series.
In this article we are going to show the various possibilities you can have to read your emails and some other interesting options.
Setting Up an Out of Office Message
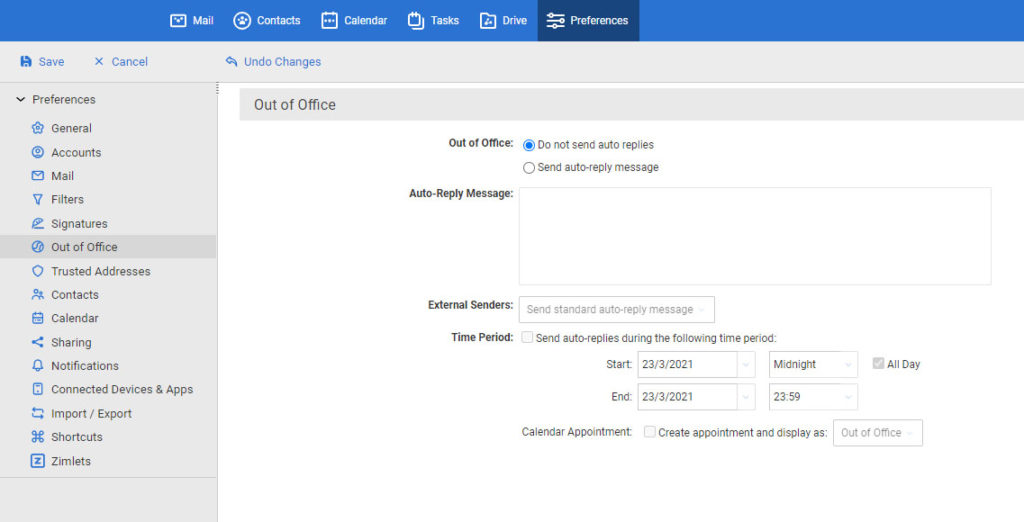
Before starting to talk about reading your email, we’d like to introduce you to an important option, very useful for your work: The Out of Office Message. This is very important when you are out of office for a certain time, for example if you are on vacation or illness. In these cases you can create a message that automatically replies to people who are sending email to you while you are not in the office.
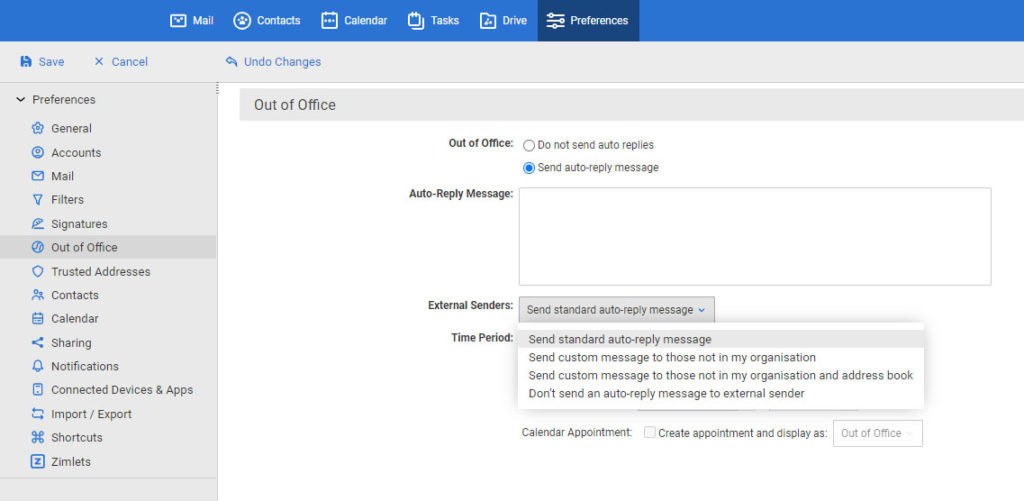
You can also choose to send different messages to people in your organization and people outside it
You can create a message that automatically replies to people who send you messages when you are out of the office.
To set up the Out of Office Message and options, go to Preferences Tab and the to Out of Office. Here check “Send auto-reply message” and then enter your message in the “Auto Reply Message” box.
You can set a specific period of time by selecting start and ending date and ticking the box “Send auto-replies during the following time period“.
Please note that if you don’t set a specific time period, the Out of Office Message will be active until you manually deactivate it by clicking on Do not send auto replies
You can optionally decide to send a different message to user outside of your domain. To do so select “External Senders“, then from the drop-down menu choose the type of users you want to receive this custom message and then create the message.
When you have finished, click “save” and exit.
Using Zimlets
What are Zimlets? They areadd-on applications that enhance the functionality of your account. In addition to those that are included with your Zimbra installation, you can enable optional ones from the Zimlet page. You can find it under Preferences Tab → Zimlets. From there you can choose which ones enable or disable.
When you are done click “save” to confirm your changes and exit.
Reading Mail
Now let’s see how to read your mail messages.
Read a Message in Conversation View
By double clicking a message in the Conversation View it will be displayed in the Reading Pane.
You can expand or collapse other conversation’s messages by clicking on “Show quoted text” or “Hide quoted text“ at the end of the selected message.
TIP: If you click on the icon in the header of the email you can collapse all messages and view only the sender’s name and the snippet of the first line of the message
Read a Message in Single Message View
If the Reading Pane feature is not enable, by double clicking the message it will be displayed in the Content Pane.
Mark a Message or Conversation as Unread
Conversations containing unread messages are shown in bold with a blue dot to the left of the sender’s name.
If you want to mark the entire conversation as unread, you have to click the “blue dot”, so that when you will expand it all the messages within the conversation will be displayed as undread.
If you want to mak a single message within a conversation as undread, expand the conversation and the click the “dot” next to the message you want to mark. All the conversation in your Inbox will be marked as undread, but by expanding it, only the one marked as undread will be displayed so, while all the others will appear as read.
Opening Attachments to an Email Message
As you know, email can include attached file of different kind, such as documents, archive files, images and many others. Messages with attachements are easily recognizable because they have a paper clip icon next to the subject. You can open any file attachment by double clicking them.
A system administrator can decide to block certain types of attachments, usually executable (.exe) ones or some archives (.zip) because they can be used to send virus to your PC as well as implementing a virus filtering for incoming mail.
View Attachments
To view an attachment, first of all you need to open the message. Then you can double-click the file to open it. If you single click on it, you can choose between different options: Preview (in case of docs), Download (let you choose if you want to open or save the file to your system) and Remove if you want to delete it.
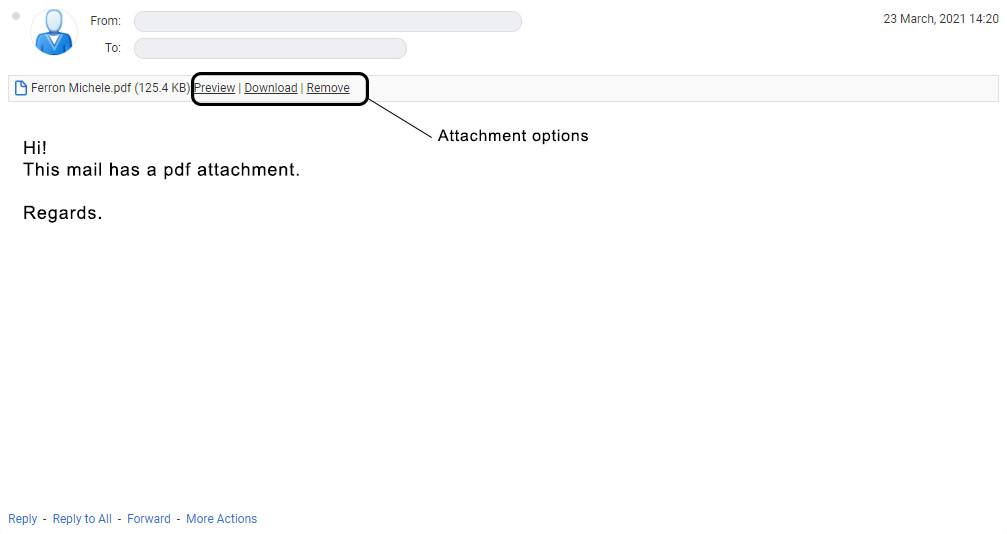
Please note that the file will remain attached to the message until you remove it.
Remove Attachments
Mail attachments are going to affect your quota, so you may want, during time, to remove larger ones from your messages. We suggest you to make copies of important ones by downloading and saving them to your PC.
To remove an attachment all you have to do is open the message, select the file to remove by clicking on it and then click “Remove”.
Preview Attachments
Some file types, such as for example PDFs or docs, can be previewed. To do so, you have to click the file, after opening the message, and select “Preview”
Displaying Messages in HTML Format or Plain Text
You can choose how you want to view your mail messages selecting between HTML or plain text. But what are the differences between these two formats?
- HTML messages have text formatting and can have numbering, bullets, colored background, and links. This for sure can make emails easier to read.
- Plain text messages, on the other hand, can always be read by other email clients. They don’t have support for any kind of text formatting, styles, links or images.
Note: You can view a message in plain-text mode even if it contains HTML. The HTML tags are displayed in the body of the message in the plain text view.
To set the display format of your emails go to Preferences Tab → Mail. Under “Displaying Messages“ select your desired option next to “Display Mail“
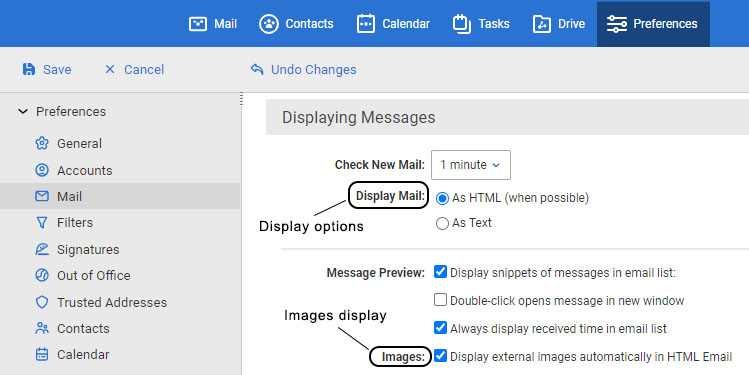
When finished, click “save” to save your changes.
Turn Off Preference to Display Images in Messages
If you choose to enable HTML view for emails, attached images are automatically displayed when you open the message. If you want to change this option go to Preferences Tab → Mail and unselect the box “Display pictures automatically in HTML Email“ next to Images.
Click “save” to mantain your changes.
Returning Read Receipts
The last option we want to show you in this article, is the “Read Receipt”.
Sometimes mail messages you are receiving can be marked to request a return receipt message to be sent back when you open that email. You can manage this kind of request as shown below:
Go to Preferences Tab → Mail. Under Receiving Messages section, you can find Read Receipt options.
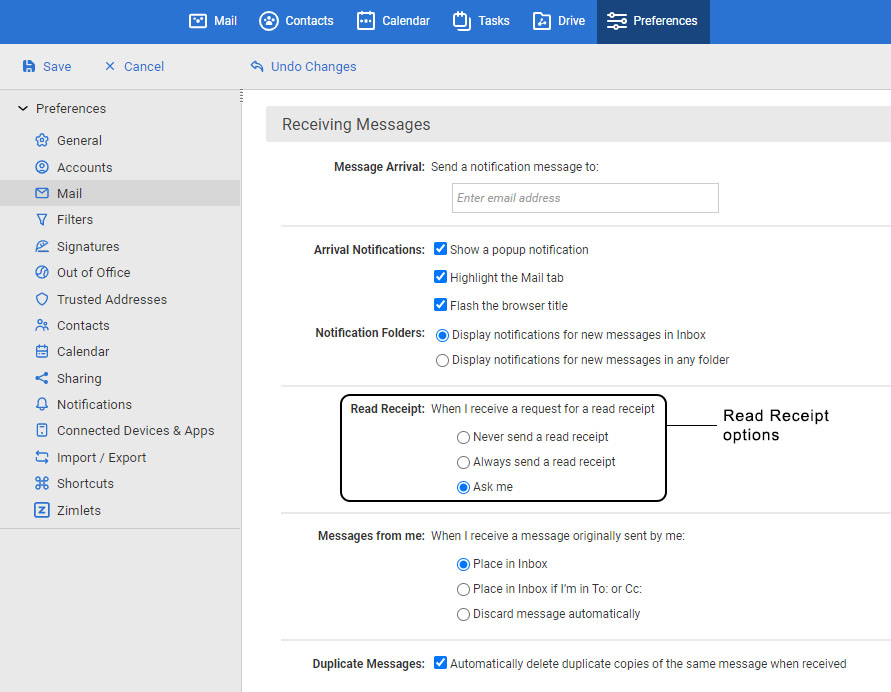
Select your desired one:
- Never send a read receipt – It will ignore the return read receipt request. You are not informed of the request.
- Always send a read receipt message – It will automatically send a return read receipt message when you open an email flagged for a return receipt.
- Ask me – Choose this option if you want to decide if you want to send or not a read receipt when you openan email flagged for that.