For additional guidance, check out our community articles detailing the process of migrating from your current platform to Carbonio CE.
For enterprise-level requirements and advanced features, consider checking out Zextras Carbonio – the all-in-one private digital workplace designed for digital sovereignty trusted by the public sector, telcos, and regulated industries.
Hi there! Here we are again, with another chapter in the Mail Management series.
This time we are going to talk about SPAM! We will guide you through all the instruments and options that can help you filter your mail avoiding unsolicited automated email or to manage messages from newsletters, for example you don’t wont to receive anymore, but maybe you don’t want to unsubscribe to or unwanted email in general.
Removing Spam
There is a spam filter which is going to handle automatically most of unsolicited automated email (spam or junk mail), filtering them before they come to your inbox. It automatically moves them to Junk folder. You can check that folder to see if any message was moved there by mistake, and you can also purge all emails in the folder. If you do nothing, all the messages from Junk folder will be automatically purged after a certain time specified by your administrator.
Mark Email as Spam
You can decide to manually mark a mail as spam. To do so, all you have to do is to select the message and then click on “Spam icon” on toolbar. Another way is to “right click” the message and then select “Mark as Spam”
In both cases the selected mail message will be moved to Junk folder.
Mark Email as Not Spam
It can happen that some messages are placed in the Junk folder by mistake, but don’t worry, you can easily move them to another folder, by simply dragging them from Junk folder to the destination one. Another way to do that is to “right click” the message and then select “Mark as Not Spam”. This will move your message to Inbox folder.
Empty the Junk Folder
As we said before, all the content of the Junk folder is automatically purged after a number of days configured by the Administrator.
By the way, you can empty the folder manually by yourself any time you want by simply “right clicking” the folder and then selecting “Empty Junk”. Click “OK” and you are done.
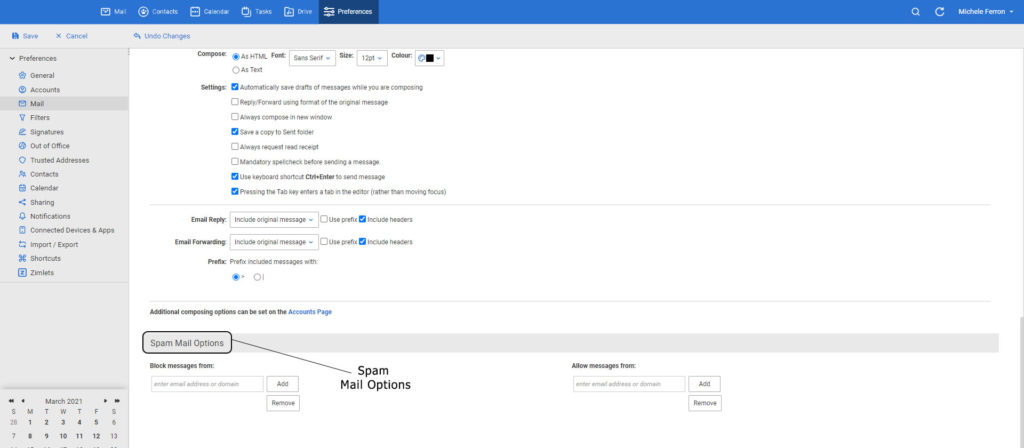
Spam Mail Options
Sometimes you can notice that some mail addresses are always being incorrectly added to your Junk folder or to your Inbox. So you might be wondering how can you change the situation and identify which addresses to block and which ones not.
You can do that following this procedure:
First of all from Preferences Tab go to Mail. Then scroll down to the Spam Mail Options section.

Here you can find two text boxes, one where you can enter the addresses you want to Block messages from and one where you can enter the addresses you want to Allow messages from.
All you have to do is to enter the address into the box and the click on “add” button. (If you add something in a wrong way you can therefore select the address from the list and click “remove” button).
When you are done, just click “save” to save your changes and exit.
In both lists you can add up to 100 addresses.
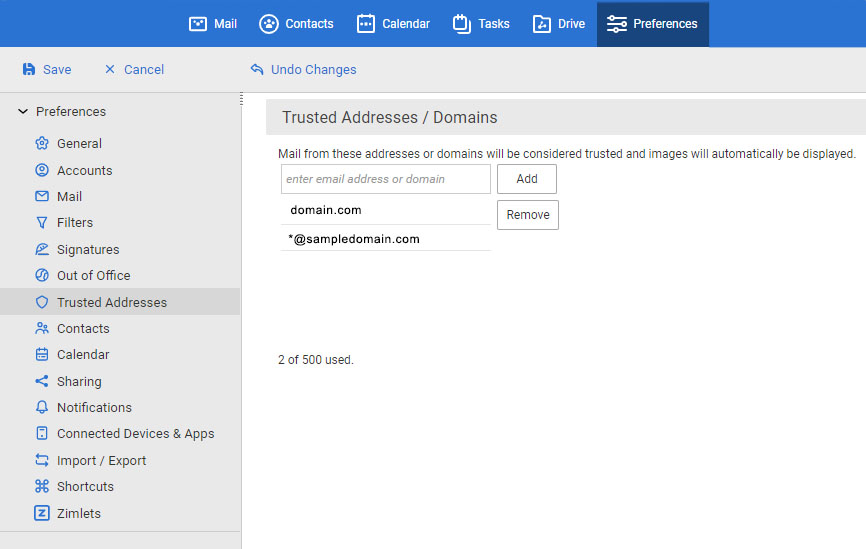
Maintaining a Trusted Addresses List
If you notice that embedded images in the email you receive are not automatically displayed, you can add the related addresses to Trusted Addresses so that from now on they will display automatically images.
To do so, you can go to Preferences Tab and then to Trusted Addresses section. You will find a text box where you can enter the email address or domain name in the text box.

TIP: You can include all addresses from a specific domain simply typing * @<domain name>
Click “add” to add the address to the list. You can add up to 500 addresses.
When you’re done click on “save” button and exit.

